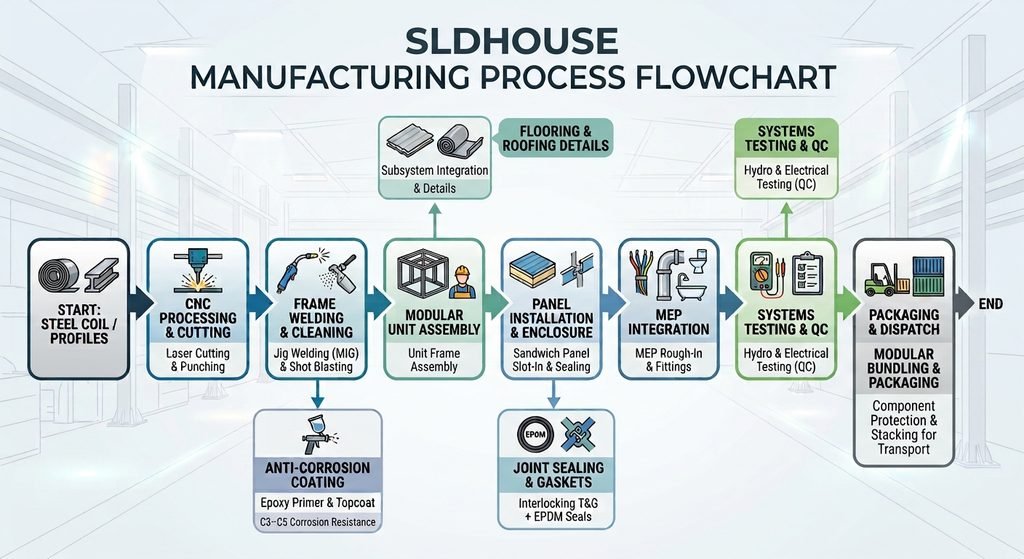
An In-Depth Look at the Container House Manufacturing Process
Detailed breakdown
Step 1: Steel Fabrication & Roll-Forming
De-coiling & Roll-Forming: Galvanized steel coils (typically Q235B or Q355B grade, 2.0mm to 3.5mm thick) are fed into automated roll-forming machines. The machine shapes the steel into custom C-channel or tubular profiles for the main beams, bottom chassis, and roof headers.
Laser Cutting & CNC Punching: High-power fiber laser cutters slice corner joints and structural gussets to millimeter accuracy (0.5mm tolerance). CNC punches press out connection holes for bolts and corner-casting alignment pins directly during the forming stage.
Corner Casting Fitment: Steel ISO 1161 corner castings—the standard heavy-duty cast-steel nodes used to hoist, tie down, and lock containers—are jig-fitted to the top and bottom frame assemblies.
Step 2: Chassis & Roof Frame Welding Jigs
Jig Clamping: Workers load the main side beams, cross-members, and corner castings into hydraulic clamping jigs. This prevents heat distortion during welding.
MIG Welding: Welders execute full-penetration welds (CO₂/Ar gas-shielded MIG welding) along the primary structural nodes. Cross-joists are spaced every 300mm to 400mm across the floor chassis to handle live floor loads up to 2.0–2.5 kN/m².
Shot Blasting & Surface Prep: Once welded, the frames are run through a shot-blasting booth to remove weld slag, mill scale, and surface oxidation. This prepares the steel for a strong paint bond.
Anti-Corrosion Coating System: The chassis receives an anti-corrosion treatment—typically an epoxy zinc-rich primer followed by a polyurethane topcoat (total dry film thickness 100μm) to withstand coastal salt-spray environments.
Step 3: Subfloor & Roof Cassette Integration
Subfloor Decking: Fiber cement boards or Magnesium Oxide (MgO) boards (18mm thick as STD) are laid over the steel floor joists and secured with self-tapping countersunk stainless steel screws.
Underfloor Insulation (Optional): For cold-climate models, glass wool or rigid XPS foam is packed into the underside joist cavities before a galvanized bottom sheet is sealed across the base.
Finished Flooring: Heavy-duty 1.6mm to 2.0mm commercial PVC vinyl sheets are glued, heat-welded at the seams, and turned up the wall edges by 50mm to create a watertight floor tray.
Drainage & Pitch: The top frame includes a integrated perimeter gutter channel. The roof panel is slightly crowned or sloped toward corner drain pipes embedded inside the four corner columns.
Insulation Core: A thick layer 50mm to 100mm of high-density PU foam or Rock Wool is fitted into the roof frame, capped on top by a 0.4mm or 0.5mm pre-painted corrugated steel roof sheet (PPGI), which is double-seamed along the edges.
Step 4: Panel Production & Enclosure Fitting
Panel Lamination: Two pre-painted galvanized steel (PPGI) skins are bonded under high pressure to an insulating core:
Rock Wool Core: 80kg/m3 to 120kg/m3 density for Class-A fire resistance (up to 2–4 hours).
Polyurethane (PU/PIR) Core: Injected foam core 40kg/m3 for high thermal efficiency.
Tongue-and-Groove Interlocking: The panel edges are shaped with precision tongue-and-groove joints. During assembly, panels slide into the bottom track of the floor chassis and interlock with adjacent panels.
Gasketing & Sealing: Workers insert EPDM rubber gaskets into the panel joints and run continuous beads of structural neutral silicone sealant inside and outside to guarantee wind and water tightness.
Step 5: Factory MEP Integration & Fitting Out
Step 6: QA/QC & Shipping Packaging